There’s all the basic cuts you need to learn as you start editing, such as L-cuts, jump cuts, match cuts, etc., but when you start having fun you’ll likely want to get into some more exciting transition effects.
You might start looking towards presets and downloadable effects packs from third-party creators, or you can learn about some of the lesser-known transitions already in DaVinci Resolve 18.
Coming from MrAlexTech is a rundown of eight “hidden” transitions in Resolve 18. There’s a pretty great variety and you can even create some of your own presets to make them easier to use later on.
All of these transitions are available in the free version of Resolve 18 and are customizable.
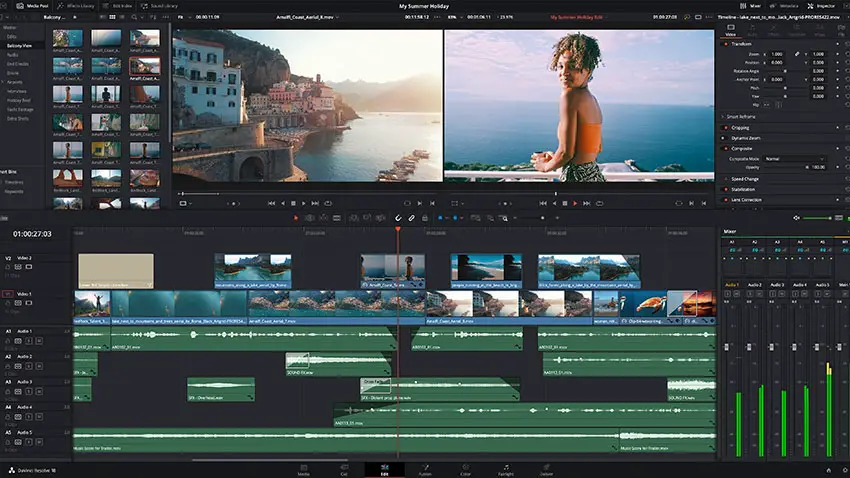
Finding them is easy. On the Edit page click on Effects and then open up the Video Transitions. Everything should be in that list for you to drag and drop them into your timeline.
They you can select it and head to the Inspector and make your tweaks. When you do that you can always right-click the transition and save a new Transition Preset with those options.
1. Glitch
So, there is actually a Fusion transition called glitch, but he isn’t a huge fan of that. What he is going to use is the Camera Shake transition to create the effect.
By default you will see that it has the shake but all a bit of RGB effects that give that glitchy look.
Diving into the Inspector you’ll find a lot of controls. The first thing he does is bring down the shake strength to 0.1 as it softens it up and makes the RGB effect more pronounced.
Next, he shortens it down a bunch. Then he increases the quality, ups the contrast, brightness, and saturation. It makes a much more effective glitch transition.
2. Circles
This is a fun little transition that can work very well with branded content as you can adjust the colors to match up with the brands.
You can find circles just underneath camera shake. Apply it to the image and pull up the controls.
You can adjust the circle colors and even the thickness. He recommends you leave the motion blur off. Quick and easy-to-use transition.

Image Credit: Blackmagic Design
3. Foreground Wipe
This is a simple, but slightly elevated wipe. You can apply it quickly and just leave it as is and be totally happy.
You can also use the control to switch from the default left-to-right to right-to-left. The part that wipes across the frame also has a border and shadow which can be adjusted. The width can also be changed to create a full-screen wipe if that is what you prefer.
4. Noise Dissolve
The noise dissolve doesn’t look too exciting as first but there is tons of customization.
Inspector controls will reveal this effect has a bunch of different versions available. Each of the six options has a dramatically different look.
Pick any of them as your starting place and then you can make some adjustments to the mix, softness, and animation.
There are specific noise controls to control things like detail and how much it bleeds into the image. You can even tweak exactly how the noise wipes across the screen, both the direction and size.
There’s a ton you can do with this one.
5. Paint On
Not as customizable as the others, but it is a nice looking transition. It does exactly what it says and makes it looks like a painter is brushing the new clip over the old clip.
One tips is to make it longer to emphasize the movement of the transition.

Image Credit: Blackmagic Design
6. Whip
There are a ton of whip transitions built into Resolve. You’ll find them listed as Pans and Slides with every direction listed.
They are simple and perhaps a little boring without any adjustments. What you’ll likely want to do to all of them is speed them up and then increase the quality and motion blur.
The blur does wonders to making this look good.
For the In/Out setting you should change it to Expo as it gives a more accurate whip feeling since it speeds up the acceleration.
7. Burn/Fire
Burn Away is a super fun option if you have a place to use it. Right away it’ll do a nice burn effect across the frame like you would expect. Add a sound effect to sell it and you are good.
The variety of customizable options are nice though.
You can change this while viewing the preview window you’ll just need to change one setting. At the bottom left of the preview window you’ll want to click the dropdown menu and select Open FX Overlay. This will show you the direction of the burn and allow you to visually control it.
You can change the motion to hotspots, directional, or path. Hotspots is fun and you can select the number of spots plus control the size of each. Just don’t make them too small or it won’t finish by default. You can adjust the end point though, so just be aware.
Path gives you a fun directional burn where the burn follows the line. You can change the ruggedness and scale of all the options.
You can also change the melt, char, color, and plenty more.
These are incredibly powerful considering they are all built-in. Which of these are you going to try out?
[source: MrAlexTech]
Disclaimer: As an Amazon Associate partner and participant in B&H and Adorama Affiliate programmes, we earn a small comission from each purchase made through the affiliate links listed above at no additional cost to you.


