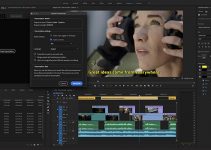
Smooth, stable footage is the mark of professional filmmaking and applying stabilization to footage in DaVinci Resolve has never been easier than in version 16. There has always been somewhat of a misconception that DaVinci Resolve is too complex.
This is entirely understandable since the often amazing and powerful features that Resolve has to offer are usually buried in menus or involve confusing nodes but Blackmagic is going a long way to make things easier to find. What used to be a painful chore in previous versions of DaVinci Resolve can now be performed right in the edit page in just a few clicks.
Have a look at Jay Lippman‘s tutorial to see how easy and effective the new stabilization tab can be in Resolve 16, and start showcasing your silky smooth footage today!
It wasn’t that long ago that I started using DaVinci Resolve. It was the summer of 2013, and it was the only software that could easily process the 14-bit raw footage from my Magic Lantern hacked Canon 5D Mark III. Ever since then, I’ve used Resolve almost every single day, and I really like it. It is (in my opinion) superior to FCPx, Premiere, and Avid in almost every single conceivable way.
But I will admit that some of the features that are intuitive in Premiere can often be obfuscated by the seemingly endless panels and tabs in Resolve. Avid, however, offers next to no intuitive features and is needlessly complicated and often slow and ridiculous. *This is coming from someone who has been using Avid for 20 years.
Previous version of Resolve placed the stabilization panel in the Color page under the Tracker tab on panel 2. If you didn’t know it was there, you might never find it. Now it’s available on the edit page, conveniently located inside of the inspector.
This is how you use it.
Step 1: Select the Clip
- On the Edit Page, Highlight Your Clip
- Click on the Inspector, in the Upper Righthand Corner
- Scroll Down to Stabilization, and Double Click It.
Step 2: Adjust the Stabilization Settings
You will be Presented with these options:
- Mode: Perspective/Similarity/Translation
- Perspective is similar to the Warp Stabilizer in Premiere Pro and will work perfectly for 99% of shots.
- Similarity and Translation are similar to using the X,Y, and Z axis to stabilize footage.
- Camera Lock
- Zooms in, and attempts to make your footage look as if it were filmed on a tripod.
- Zoom
- Confirms you want Resolve to Zoom-In to stabilize.
- If left unchecked, Resolve will stabilize the footage but you’ll see it floating around in a black box.
- Cropping Ratio
- How much you want your footage cropped to stabilize it.
- The lower the cropping ratio the more zoomed-in the footage will be.
- Smooth
- Determines how smooth the camera movements are.
- Strength
- Tells Resolve how strong you want the stabilization to be.
- This is set to 1.0 (the maximum) by default.
Click Stabilize
Step 3: Review and Adjust
You might notice that your footage is too zoomed in for your liking or that there are too many motion artifacts created by the stabilization effect. Refine your settings and keep trying until you find the magic sauce. There is no 100% correct way of doing this (aside from filming stable footage to begin with).
If you’re image looks a little warped try switching to the Translation mode, and drag the Smooth slider put some ease on those larger movements.
After every adjustment, hit Stabilize and review your footage again.
DaVinci Resolve is a fantastic, free software that is frankly the most powerful video editing application there has ever been.
As a professional I have to know and use every editing and graphics software that is available to some degree, and I often find myself wishing that we, as an industry, would collectively switch over to DaVinci Resolve and stop using everything else.
DaVinci Resolve is fast and fun, and once you figure out some of its logical quirks it really makes a lot of sense. Give this tutorial a try and see how stable those shaky shots can be.
[source: Jay Lippman]
Disclaimer: As an Amazon Associate and a participant in other affiliate programs, we may earn a small comission from qualifying purchases made through some of the links on this page - at no additional cost to you.


