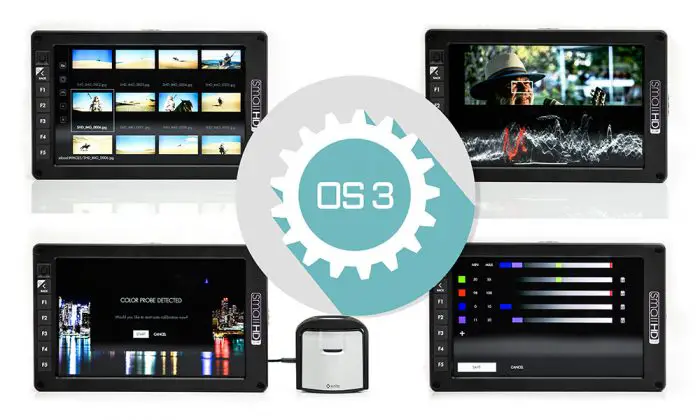
SmallHD have just released a brand new firmware update for their on-camera monitors such as the SmallHD Focus and 500 series as well as their larger, production monitors.
Firmware version 3.1.2 is so packed with new features and improvements, that SmallHD are calling it OS3. You can find all the particular details a bit further down below in this post, but this firmware sure is a doozy. Major new updates include a new autonomous calibration feature that lets you calibrate your SmallHD monitor without the use of a computer. This can be very helpful when out in the field.
False Colour also gets a massive new update – with the ability to fully customize how you want to expose your image given user defined IRE ranges. False Colour is a very common preferred way to view your image and adjust exposure, so all you DPs out there who prefer your false colour to a waveform monitor or zebras, you now have the ability to tailor your favourite exposure tool to your liking.

Speaking of the waveform, SmallHD have now added a spot meter in this function, which is also quite helpful. However, for me personally as a SmallHD Focus owner, the addition of a proper percentage based battery indicator is a huge improvement – since I am not used to reading a battery by voltage (i.e. as in RED cameras for example), and I am sure many of out there will appreciate getting a simpler percentage battery readout instead of a voltage indicator.

What’s New in SmallHD OS3 Firmware ver.3.1.2:
- Auto-Calibration – Utilize official SmallHD colour probe to auto calibrate your monitor
- Auto Calibration can be cancelled at any time
- Auto Calibration shows a progress bar at the top of the display
- Once finished, the user can toggle between the new and old calibration before accepting the new one
- Fully Customizable False Colour (Exposure Assist)
- When selecting a exposure assist tool options for a “map1, map2, map3” are now selectable
- User can create a custom false colour for each map
- Each map can have up to 10 user defined IRE ranges, and every IRE range’s highlight colour can be configured individually
- User may delete and modify defined IRE ranges and highlight colours at any time
- Spot Metering in LUMA Waveform
- Select a location on the on-screen image and see highlighted data for selection
- Spot Metering box size is customizable
- Image Gallery Viewer
- Image files are now displayed in thumbnail form instead of list form
- The size of the thumbnails can be modified
- The files can be sorted in either increasing or decreasing order by Name OR Date
- A new element called “Image Gallery” has been added to settings->capture to allow users to peruse their removable media storage at any time, even when no video signal is present
- Adjustable White Point – The user can select a non-standard white point for their input space
- The supported white points are:
- D65
- DCI-P3
- 3000K, 5000K, 5600K, 9300K
- When loading a 3D calibration LUT, the user can now specify the white point the calibration LUT targets separately from the color space that LUT targets
- The White Point targeted by Auto Calibration can be configured in the same way
- The supported white points are:
- SmallHD FOCUS monitors will now accept 4K/30p video input via HDMI
How to Update a SmallHD monitor
Important: Make sure you do not lose power during firmware update
- 1. Download the latest .bin file version 3.1.2
- 2. Drag and drop .bin file from download onto your SD card
- (Must be 16gb or smaller – FAT or FAT32 for Windows, MS-DOS (FAT) for Mac)
- 3. Remove SD Card from computer or card reader attached to computer
- 4. Insert SD card into your SmallHD monitor
- 5. Turn on your monitor
- 6. Swipe or toggle left to right on your monitor all the way to the monitor’s Settings Menu
- 7. Select Firmware Update in Settings Menu and follow on-screen prompts
- 8. Once the firmware is installed and the on-screen prompts tell you to reboot your monitor:
- Hold down the power button for at least 5 seconds and then release.
- 9. Press the power button again to begin operating your monitor with the new firmware installed.
Here’s a neat explainer video that SmallHD has prepared demonstrating Auto Calibration in SmallHD OS3 firmware 3.1.2:
To download SmallHD firmware OS3 ver. 3.1.2 head over to SmallHD here.
Disclaimer: As an Amazon Associate partner and participant in B&H and Adorama Affiliate programmes, we earn a small comission from each purchase made through the affiliate links listed above at no additional cost to you.


