In the latest version of DaVinci Resolve 12.5, Blackmagic Design overhauled the Log grading controls along with the overall approach these settings affect colours. Currently, they provide much smoother and more pleasing results, especially when it comes to color grading Log-encoded images.
All in all, now there are two ways of using the Log mode controls. On one hand, you can utilise these settings to make quick, colour grading adjustments to your Log footage while it’s normalised by a LUT. The other way is actually the one showcased by Theo of MiesnerMedia in the video below where the colorist takes advantage of the more restrictive, but adjustable tonal range of the Shadow, Midtone and Highlight controls to stylise the look of the Log-encoded clip by tinting specific regions of the image.
It’s worth noting that the Shadow, Midtone and Highlight colour balance and Master Wheel controls in DaVinci Resolve 12.5 operate independently of the Lift, Gamma and Gain color balance and Master Wheel controls of the Primaries mode. In other words, while the Log mode uses the same type of controls as the Primaries mode, the way each control affects the image is very different.
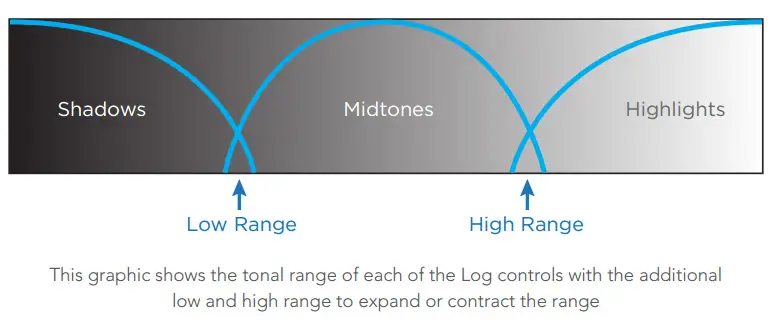
Furthermore, unlike the Primaries controls, the latest Log grading controls feature Low Range and High Range controls. In essence, these two parameters let you modify the range of shadows and highlights that each colour balance control affects. They also modify the midtones by either narrowing or widening the range of the latter. Keep in mind, though, that while the ranges can be customised the amount of overlap between each range stays the same.

As we can see in the video above, by utilising these both settings it’s now a lot easier to color grade different parts of the image right off the bat without the necessity to use qualifier and isolate different colour sections of the image to achieve excellent film-like looking images.
For instance, you can now easily make the background of your footage cooler, without affecting the skin tones of your talent. If you have a similar shot like the one showcased in the video tutorial, all you need to do is to push your midtones towards blue and then adjust the Low Range and High Range controls accordingly.
Ultimately, on occasions when you need to toggle between the older Log control behaviour of DaVinci Resolve 12, you will need to enable the Use legacy Log grading ranges and curve option in the Color Panel of the Project Settings. Also, take into consideration that all your older projects that you tend to open in DaVinci Resolve 12.5 will have this checkbox turned off by default, so if you want to use the older Log control approach you will need to enable this setting manually.
[source: MiesnerMedia]
Disclaimer: As an Amazon Associate partner and participant in B&H and Adorama Affiliate programmes, we earn a small comission from each purchase made through the affiliate links listed above at no additional cost to you.


The low range and high range controls to determine log ranges has been there for many years already. That’s actually not a new feature.
Sure, but the way now these controls affect colours is a whole different story.