Three months ago Avid upgraded their existing intermediate codec DNxHD by adding DNxHR codec flavours that now support resolutions higher than HD. The new capabilities of the codec are based on an architecture called Avid Resolution Independence announced earlier in September that supports 2K, UHD and 4K native editing inside Media Composer 8.3.
If you already are an Avid editor, and you have a Subscription, Floating License or Perpetual license with an Upgrade & Support plan, you get this new version as a free update. You should see notifications for an update in your Application Manager. Just click “Update” in the Application Manager to start downloading this latest version. If you want to install the software manually, you should go to your Master Avid account or the Video Download Center to get the Installer files.
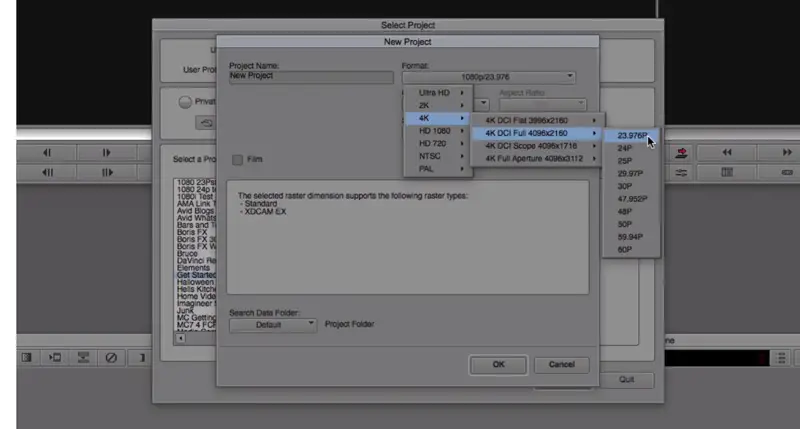
This is how to set up a 4K project within Avid Media Composer 8.3.
You should set your project format according to the highest quality required for the final delivery. The settings you choose for your project will have a direct impact on the way your material will be further handled by the various editing functions within the Avid editing application.
Regardless of the project output format, however, you can still work with media of different frame sizes, aspect ratios, and pixel aspect ratios in the same sequence. You can mix various media formats as the application automatically resizes and repositions these clips to match the project’s format settings.
When creating a New Project in Media Composer 8.3, you will immediately notice that now you have the ability to choose 2K, UHD and 4K resolutions for your project. For instance, under the 4K drop-down menu, you have four different main options: 4K DCI Flat (3996 x 2160), 4K DCI Full (4096 x 2160), 4K DCI Scope (4096 x 1716) and 4K Full Aperture (4096 x 3112). Furthermore, you can select a particular frame rate for each project up to 60p.

Inside the Format Tab of the Project Window now you can navigate to Proxy mode that gives you the ability to downscale the original frame size of the high-resolution clips in your project to 1/4th or 1/16th of their native resolution. So if you are experiencing any problems sustaining smooth real-time playback of your media files you can always choose one of those options in order to optimise the playback performance as shown in the above tutorial.
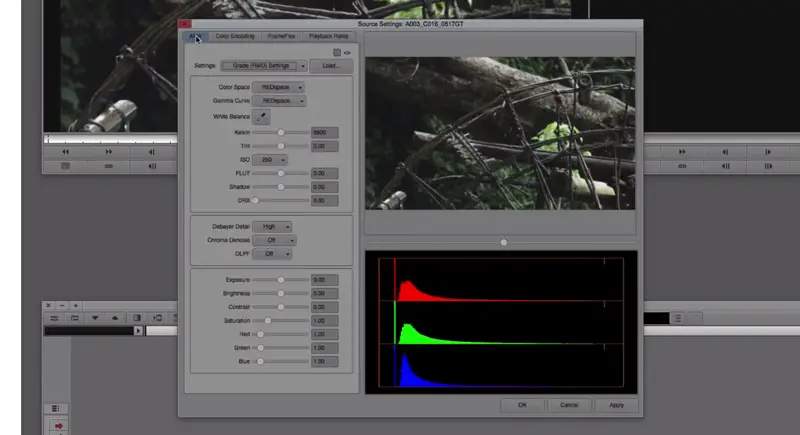
Furthermore, if you work with native .r3d files, now you have the ability to access the raw settings of the selected media in the AMA tab after right-clicking over the .r3d clip in your bin and choosing Source Settings. In the same window, you can also apply a LUT to the image, reframe it or/and change the clip’s Playback Frame rate. The new adjustments will be immediately executed by pressing the Apply button in the bottom right corner of the window.

If you want to get more in-depth and detailed information about the new high-resolution workflows and the new features to the latest Media Composer version you can download the High-Resolution Workflows Guide that Avid released as an add-on to the most recent update of the platform.
[via studiodaily.com and avidblogs.com]
Disclaimer: As an Amazon Associate partner and participant in B&H and Adorama Affiliate programmes, we earn a small comission from each purchase made through the affiliate links listed above at no additional cost to you.


